Hearsay Social
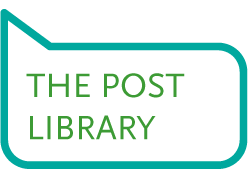
The Post Library page is where you can access the suggested content library – a sortable and searchable selection of pre-approved posts from National Life and approved third-party sources.
Scroll over the hotspots to learn more about the page functions and features.
1
Post Library Categories Suggested: Pre-approved original and and curated content available for instant publishing or scheduling.
2
Pre-released: Pre-approved content that is coming soon but is not yet available to be published.
3
Campaign: Content that is part of a campaign and is currently scheduled to be published later.
4
Scheduled: Content you have chosen to publish a later publishing date.
5
Published: Content that has been published to your connected social accounts.
6
Denied: Original content that was created by using the New Post button but was deemed outside of compliance.
7
Pending: Original content the user has created by using the New Post button which requires compliance review and approval before publishing.
8
You can also post Custom Content within Hearsay. Please see our Social Content Guide to review the importance of custom content to your social efforts and to understand important guidelines before doing so.
9
Search Box: Search a keyword or topic to find related content.
10
The filter function allows you to sort posts by modification rules, content type, networks, and tags specific to topics of discussion.
11
Sort Posts by: Engaging – content that is receiving the most likes, comments, and shares on social media. Popular – content that the majority of National Life users are publishing. Recent – the newest content added to your library.
12
Social Icons: There are social icons on each piece of content indicate which social network(s) the post is formatted for.
1-7. Post Categories
- Custom Content
- Search Box
- Filter Function
- Sort Posts
- Social Icons
Publishing Content
PRE-APPROVED CONTENT
The Post Library contains pre-approved content created by National Life. You can find content by categories and using the filters mentioned in the previous section then post content to your social media networks using the steps below.
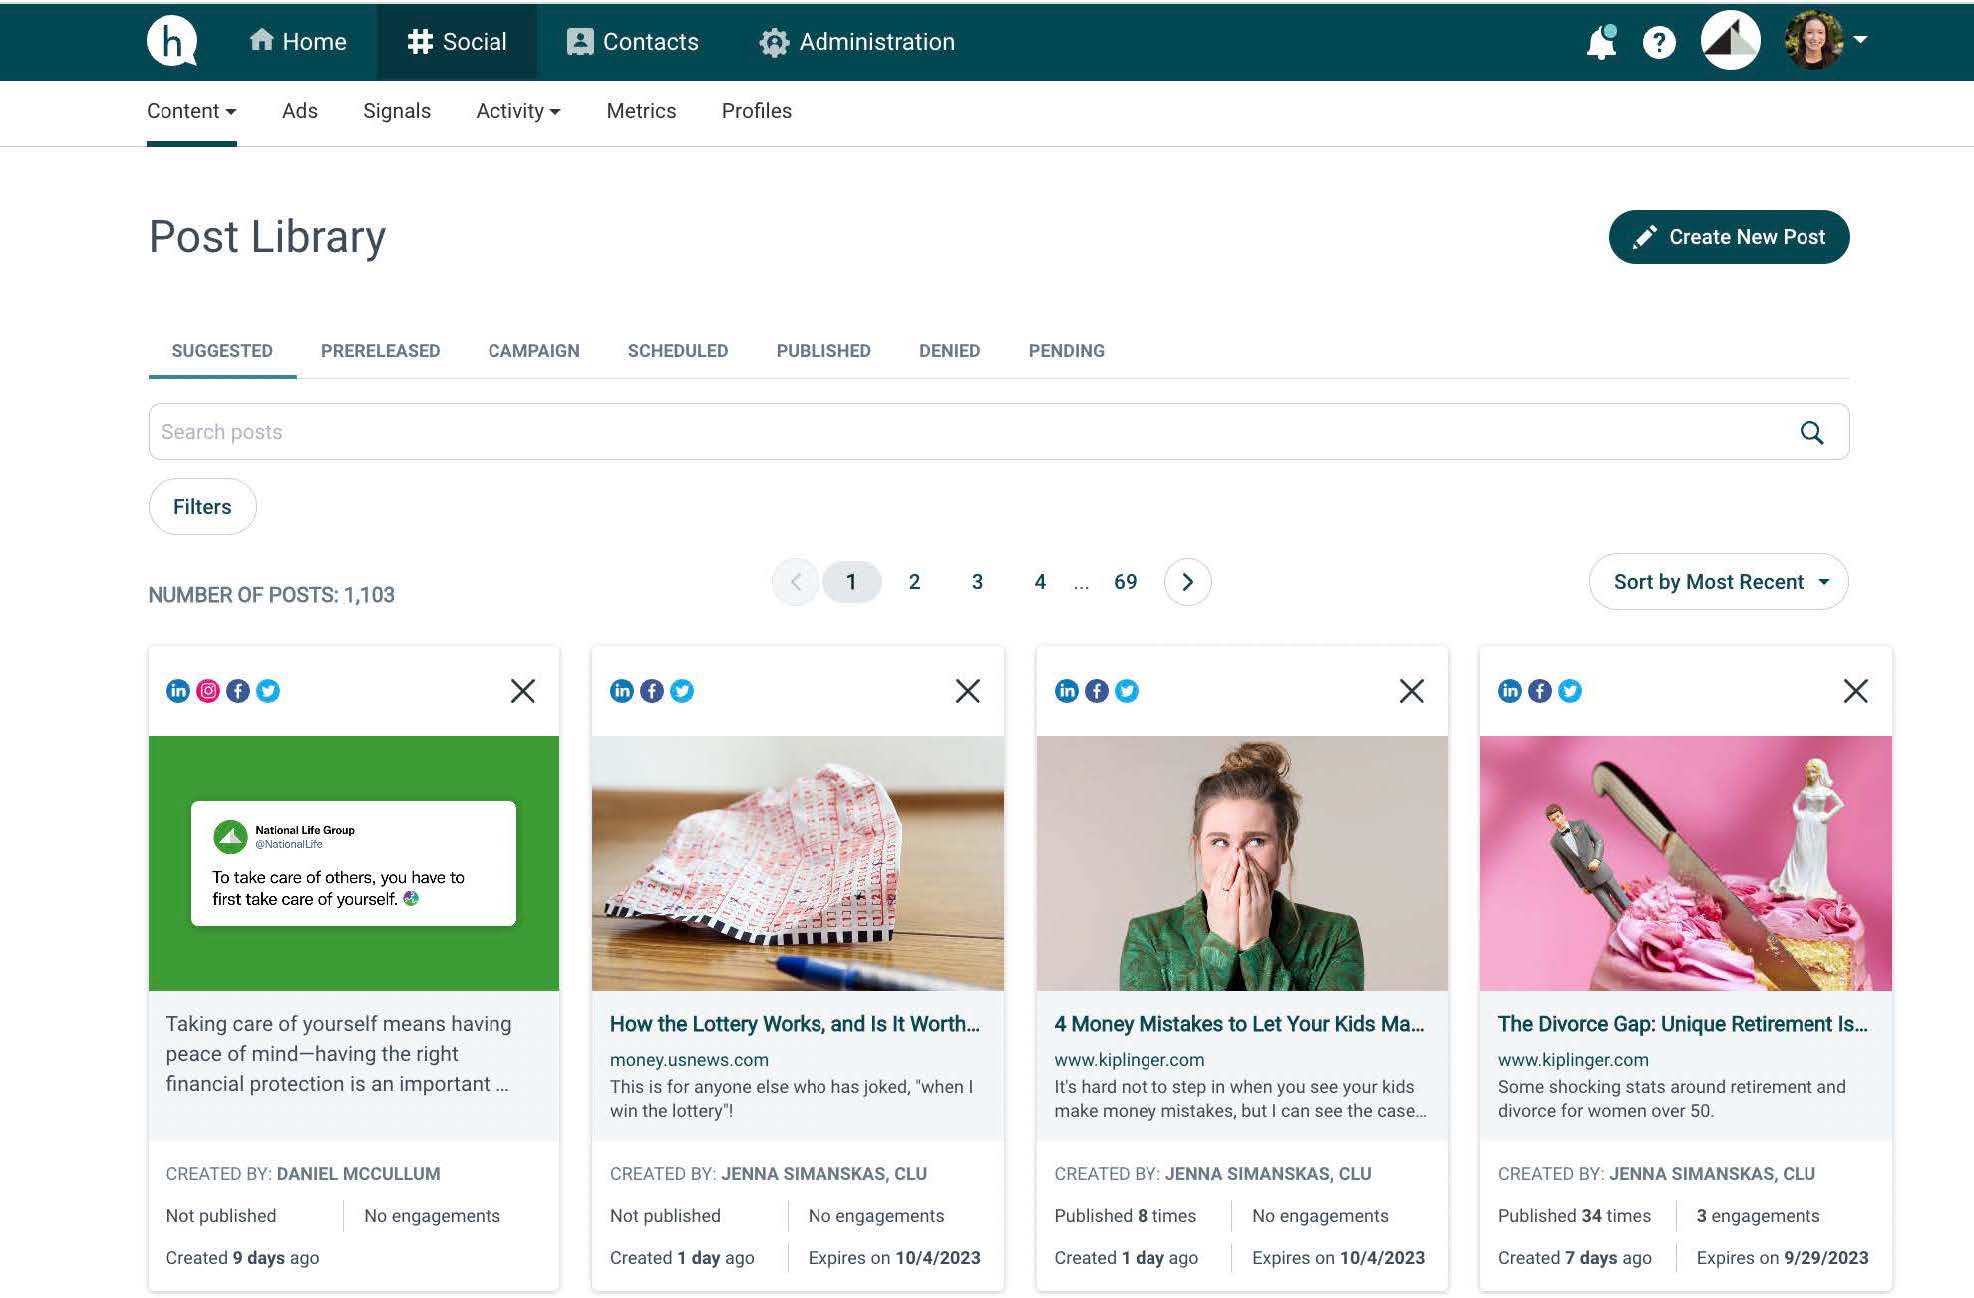
- Choose your Content: Once you have selected a piece of content to post, click on the desired post. This will open the publisher window. – For some content, you will see a pencil icon that will allow you to edit the post message, thumbnail image, content header, and sub header. Any changes you make will need to be reviewed by compliance for approval.
- Select Your Accounts: Under “Accounts,” select the social network to which you’d like to post. Note: The social icons shown under each piece of content in the library indicate which social network(s) the post is formatted for.
- Select the Post Time: This allows you to schedule a date/time for when the post will publish and go live. Posts can be published instantaneously (Hearsay’s default setting), at a Custom Time, or at a Suggested Time. Hearsay provides Suggested Times to post to social networks based on when your audience is most active.
- Publish / Schedule or Request Approval: If you did not modify pre-approved content, you can schedule or post immediately. If you changed anything, you will need to click “request approval” to finish proposing your post.
For more information on posting content through Hearsay watch this video.
CUSTOM CONTENT
You can also post Custom Content within Hearsay.
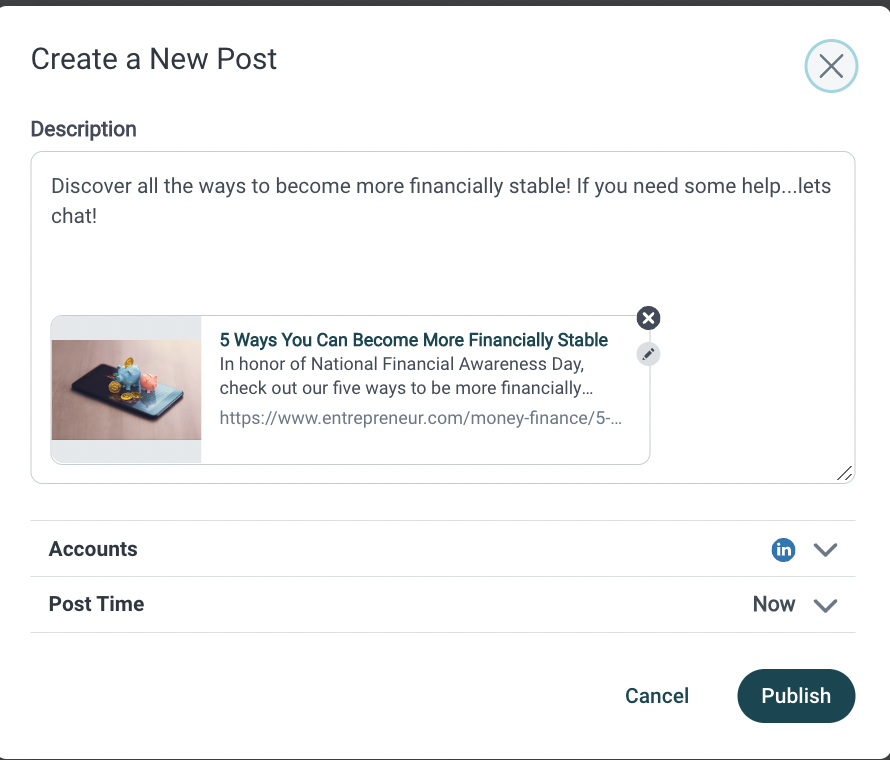
- Start New Post: Click the the upper right-hand button labeled, “New Post,” to open the publisher window.
- Add Your Content: From here, you can add your post elements: write your copy and attach an image as necessary. You can also create a post by copying and pasting a link to a piece of published content (like a blog post or news article). This will automatically to pull in an image, header, and sub-header. You will also be able to edit each field.
- Select Your Accounts: Under “Accounts,” select the social network to which you’d like to post. Available accounts will be those you’ve connected to your Hearsay workspace.
- Select the Post Time: A key functionality in publishing content within Hearsay is the “Post Time” functionality. This allows you to schedule a date/time for when the post will publish and go live. Posts can be published instantaneously, at a custom time, or at a Suggested Time. Hearsay provides Suggested Times to post to social networks based on their aggregated data.
- Request Approval: Any custom content you schedule will require you to “Request Approval” to complete it. Your original content will be routed to the compliance team for review, and only if it is approved your content will it then schedule or publish as created. If the post is not approved you will be notified within the Hearsay Workspace.
Scheduling Posts
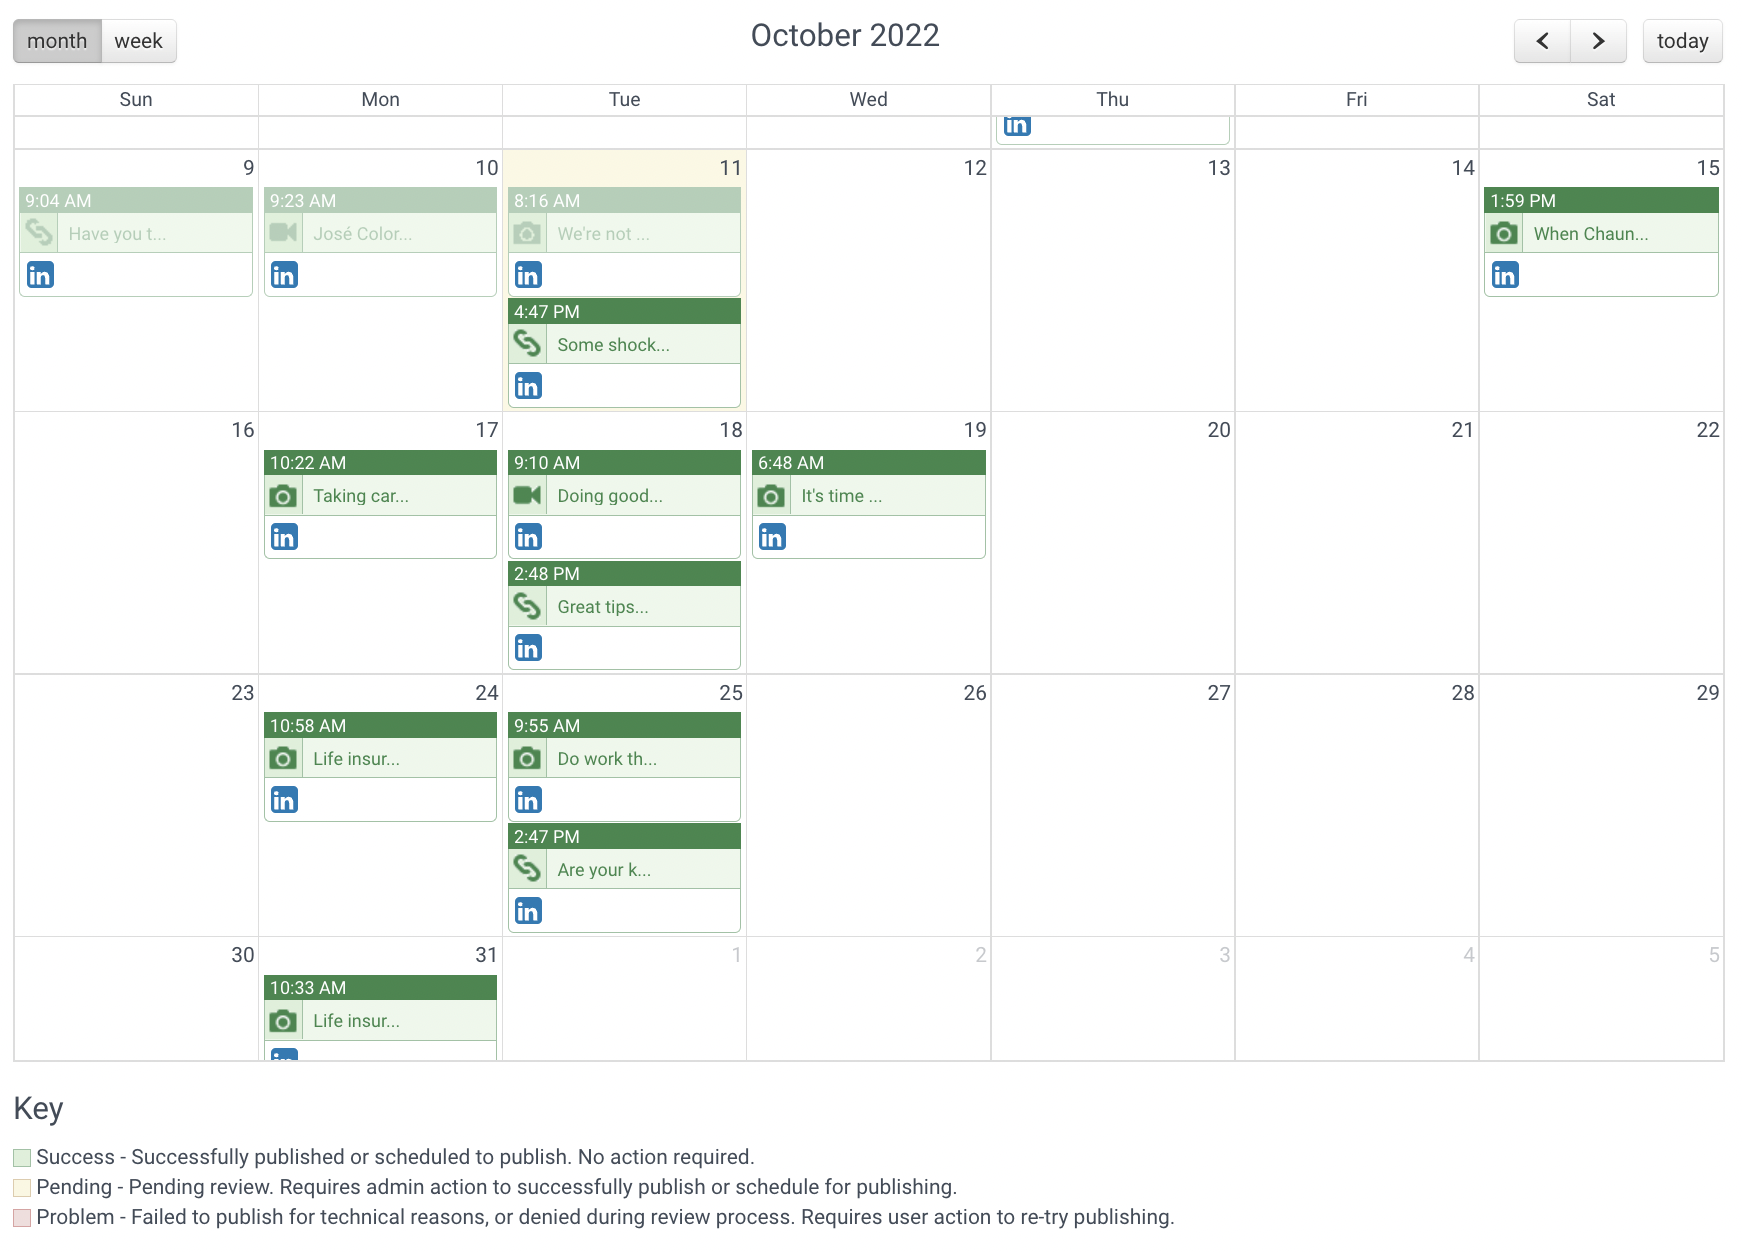
Post Calendar
Select Calendar on Content tab dropdown to view the posts you have submitted for approval, scheduling, pending, denial, promoting, a part of a campaign, or publishing in the past on an interactive calendar. You can also create and schedule posts by selecting a day and time on the calendar. The Key at the bottom of the calendar will indicate a scheduled post’s status:
- “Success”– Successfully published or scheduled to publish, with no action required.
- “Pending”– Pending review and requires admin action.
- “Problem”– Failed to publish for technical reasons or denied during review process; requires user action to re-try publishing. Need to move something around? If you already have a post scheduled for a given day and want to space things out, you can easily move posts around or delete posts from the calendar view.
Campaigns
A campaign consists of multiple pieces of content that are grouped together and released separately at timed intervals as a fluid set of posts. Campaigns are often centered on a single theme and are released on a staggered basis. To access Campaigns, select “Campaigns” from the Post Library sidebar or Content tab drop down.
There are two types of campaigns:
Dynamic Campaigns
Content within these campaigns have pre-determined dates on which the content will publish, set by your social media and compliance team. Admins can also add additional content to Dynamic Campaigns. As long as you are subscribed to a Dynamic Campaign, all existing content, and content added to the campaign after you’ve subscribed, will still be scheduled on your behalf. Dynamic Campaigns usually focus on date-specific content for certain topics.
NOTE: As of 10/30/2019, all NLG campaigns available for the Affiliated Producers Network are Dynamic Campaigns.
Relative Campaigns
Content within these campaigns have pre-determined dates, relative to once you’ve subscribed to the campaign (eg. Content is set to schedule 1, 2 and 3 days from when the user subscribed).
Relative Campaigns usually focus on evergreen, or non time-senstive content that can be published throughout the year.
How To Subscribe
Using Campaigns is as easy as clicking subscribe! To subscribe to a campaign, simply click “subscribe to campaign”. Be sure to review details or peruse future planned content by clicking “see all posts” to make sure a campaign is a good fit. If you’d like to change where the campaigns publish, hover over “allow publishing posts to” to toggle which social channels you’d like to publish to. Generally, it’s recommended to share to all channels unless you have a specific reason not to, like you’re only publishing certain content on a particular social channel.
Ads and Promoted Content
WHAT CONTENT CAN I BOOST
You can only promote Facebook posts that you’ve already published. Currently, promoting Facebook posts through Hearsay is the only compliant way to conduct paid advertising on social. This is because Hearsay’s Facebook integration is the only process that allows us to compliantly archive any paid posts.
Types of content boost/promote
Successful Content Boost content that’s been getting attention for you on Facebook recently. If your immediate audience likes something, it’s likely a broader audience will too.
Upcoming Events
If you’ve posted about an upcoming event, think about giving it a boost. It could help you build awareness.
Highlight Success or Expertise
If you have an approved post that generally highlights you or your firm’s expertise, boosting this type of content can help build brand awareness and trust.
SET UP A FACEBOOK AD ACCOUNT
- Open your Facebook Ad Account Before you can connect an Ad Account to Hearsay you need to create one within your approved Facebook Business Page. Use Hearsay’s instructions for promoting posts to set up your ad account. NOTE: You’ll need to ensure that you connect a payment method as shown in he guide even if you’re not trying to boost a post immediately. You’ll need a payment method in the system to connect to Hearsay.
- Connecting Your Ad Account to Hearsay Navigate to the Connect Accounts page. Click your user panel and select Connect Accounts” from the dropdown menu.
- Select Your Linked Facebook Page Navigate to your Facebook page from the options available and click “Edit” at right. From there, you’ll see your Facebook page. Click “Edit” at right.
- Authorize the Connection Under “Publish Content” scroll to “Promote Posts” and click on the button labeled “Connect Ad Account” to authorize the connection to Hearsay NOTE: You may need to re-enter your password and manually authorize the Hearsay connection.
PROMOTE A POST
- Select Published Content to Promote From the left-hand menu, select “Promotable Content” to see posts that you’ve made which are available to promote. Click the post you’re trying to promote, then click “Promote Post” in the window that appears. Remember, you can only promote what you’ve already posted. Quick Tip: Select a recent post to promote. Older posts may not perform as well, but if you still want to promote older content, repost it before you promote it.
- Define Your Audience Demographics From the promote content window, you will want to include important demographic information to target your Facebook post to the right audience. While there are options to filter by life events and interests, the most important variables are in the demographics section. You only want to serve your boosted post to individuals in your coverage area. Ask yourself: whom do you want to reach? This will help you target the Demographic Variables to Select From: Location It’s important to only target zip codes in your area. Select several zip codes for neighborhoods you serve, or type in your city and select it to target the entire area. Age If your post is meant to attract a certain age demographic, ensure that ou select it here. Try to stick to a 10 year plus range. Gender Unless you’re very specifically trying to reach exclusively men or women, leave this set to “All”. Connections Leave this set to “All”. right individuals. For example, if you are trying to reach retirees or near retirees you will want to target to individuals who are 50+
- Other Optional Targeting Options If you’d like to get more precise in your audience selection, you can select life events or interests to target. We recommend that you do not get too specific in these fields. If your audience is too narrow, it may work against our potential boost performance. – Life Events ‒ there are several life events to target to. Available options re shown below. These are valuable if you are trying to target individuals who have hit these life milestones. However, you donʼt want your audience to be too niche, especially if you serve a smaller community. – Interests ‒ there are several available interests to target to. Explore your options in Hearsay to see if any fit your intended audience.
- Set Your Budget How much should you spend on your boosted post? We recommend that you start with $5 a day for a week. If you see good results through a lift in reach and engagement, you can adjust things accordingly next time you boost content.
- Set Your Schedule Select the range of time in which youʼd like to boost your post. Again, itʼs best to try something for a short time to see how things go.
- 6. Finalize Your Post When details are complete, click “Promote Post” to finish up.
National Life Group® is a trade name of National Life Insurance Company (NLIC), Montpelier, VT, Life Insurance Company of the Southwest (LSW), Addison, TX, and affiliates. Each company of National Life Group® is solely responsible for its own financial condition and contractual obligations. LSW is not an authorized insurer in NY and does not conduct insurance business in NY. Equity Services, Inc., Member FINRA/SIPC, is a Broker/Dealer and Registered Investment Adviser affiliate of NLIC. Third party entities are independent of Equity Services, Inc. unless otherwise stated.
Home Office: One National Life Drive, Montpelier, VT 05604 | (800) 344-7437 | www.nationallife.com
No bank or credit union guarantee | Not a deposit | Not FDIC/NCUA insured | May lose value | Not insured by any federal or state government agency
Guarantees are dependent upon the claims-paying ability of the issuing company.
FOR AGENT USE ONLY – NOT FOR USE WITH THE PUBLIC
TC131187(0123)3 | Cat No 105353(0123)